My 48" X 48" CNC Router Table

so, if i have battery backup for the CNC computer... what about the machine? may be a good use for my Off-Grid experiments. i could build a battery backup for the machine logic. i could set it up to maintain off of solar/wind power, and when i am using it, boost it with an AC to DC converter/charger.
so rather than the AC ATX PSU, for 5V (15A) and low current 12V (about 10A) i can use the DC ATX PSU. the question is what mode to put the PSU in. in standard PSU mode, it uses more power, but in low power mode it requires more electronics to turn on and off. i think it needs to be in standard PSU mode, with a relay on PS-ON tied to machine power, so it will activate when the machine poweres on. the problem there is in a power fail. maybe power the machine AC, then the logic in a sepperate switch. then 5v, 12v, and 24v will be powered from battery. 24v through a relay to a DC to DC boost converter.
i have a battery box i could use to keep the batteries outside, may only need a slight modification.
the idea is not to run the machine off battery, hence, no stepper power. but to allow the machine to stop and apply the Z brake, and E-stop or pause when the power fails. likely an e-stop, as the work will be wasted anyway, but i don't want the machine to eat itself while the spindle comes to a stop.
 
if i run cables from the logic box to the control pendant console from the 7i72, i can power the LED button lights to show active toggles, like "pause". will be handy so i know when to hit the "resume" for example. when i re-do the wiring, i can re-use the DB-25 cable for this task. may need both cables, plus some. depends on how many buttons i need. 8 X 8 matrix has a max of 64 buttons. if i need 64 buttons, i have issues. :rolleyes: not all buttons need to be lit. i may even put a tower light on the control console. and my 7i72 can only do 48 outputs, so i may need a second one, if it comes to it. i need to really decide how many lights i need to light. the boards are $119 each.
 
cable_lace.jpg
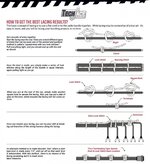
for on-machine cable looming, i am going to try cable lacing. it looks easy, and has a neat and clean appearance when done. only places i have to worry about are up on the Z axis, along the X axis, and the tail off the Y axis. i can loom other exposed wires too. like the wires leading to the control console, as it will have quite a few light wires... though on that... i wonder if i should put a 7i71 right in the console, and just run power to it. it is only running LEDs. but that would allow for many LEDs, with just a second CAT5e cable, plus the 12V power source.
 
thinking of moving the tool sensor to the back of the machine, out of the way, leaving tool slot #1 open for manual changes, and keeping the tool sensor safe and out of the way. i want to put it in a spot where the laser can also use it, to make sure it stays in focus. i can measure the laser snout length, and add the difference to 50mm, as 50mm is to the laser base, not snout. this way, the laser is measured for focus every time, at start of run, and should be stable. so long as i get the math correct, that is... the other option is to use tool #100 as the laser offset, and set a tool offset for it of the probe result + the snout difference to 50mm. then just run the machine to Z0 to focus the laser. or rather, move to X0 Y0, and THEN move to Z0, so as not to knock the laser off the machine, as that would be expensive.

i also should setup an air line to the tool sensor for a pre-measure blast of air. should be easy enough to do. i think i need another air inline needle-valve, but full PSI may be fine, for a short blast.
 
Ordered some bigger drag-chains for the machine wiring and air tubes, so no more zip-tied to the outside of the too-small chains. next will be figuring out how to mount them. on the X and Y axis, i need to make some chain trays to support the chains. can be done with just aluminum trim-coil. the X-axis mounted chain tray can be supported with T-nut hardware holding some extrusions in place. i need two extrusions on the X-axis beam to support the chain and tray, and a third mounted on the Z-axis to support the other end of the chain. the chain will just ride up and down with the Z-axis, as it does now. there is no place on the Z-mount to mount a support between the X and Z.
i may re-do the Z-axis wire support better too, and mount it not with the stepper mount screws.
 
Rather than the DC conversion, i will continue with AC to the VFD, and AC to the logic and steppers via my Camper 100A PSU set to 12V even, and with a DC-to-DC converter for 12v to 48v added, so the machine will have one 240Vac connection and one 120Vac connection, so i can separate the VFD power from the logic power at the panel. but in this way, i can still go DC for logic if i need to for battery backup. i could still plug the Camper 100A PSU into a big UPS if needed, for backup power, as it only draws around 12A full load. but having just the one AC PSU for logic and stepper, will be handy.

so the VFD will use a standard dryer outlet for 240Vac, and the logic PSU can plug into a standard outlet. i can mount the outlets on the floor, so i can have shorter cords from the machine. then just run metal conduit to the floor boxes, and it will be fine.

so, the machine will have two breakers. 30A double-pole for the VFD, and 15A single-pole for the logic. the CNC computer will also be on it's own 15A circuit. that way if the regular outlets pop a breaker, the machine will not fail. i could put the computer on the same as the logic, but 12A plus a computer... could be too much for a 15A circuit.
 
Actually, i may continue as planned with the DC conversion. the benefit will be that i can run the CNC, other than the VFD/spindle, off of battery in the event of a power failure. and after the conversion from 12V to 24V relays, i can do away with most of the 12V load, leaving just the laser.
as the supply will be running through my solar charge controller, i can leave the charger connected full-time, and just boost the voltage up to a higher level for better charging. i should really upgrade the charger to the 100A version too, to take advantage of the 100A source.

So 240Vac power for the VFD, and a set of cables for DC power. pretty sure i have some 8AWG cable somewhere. i can use some Andersen SD50 connectors for disconnects. they should be good and secure.

Screenshot 2024-04-11 at 13-29-57 s-l1200-5.jpg (WEBP Image 1200 × 749 pixels) — Scaled (94%).png
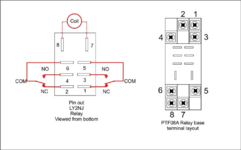
found this diagram for my relays and bases, so wiring looks simple. i got a set of 9, but i may only need like 3. this is because the air solenoids are 24V too, so i can drive them direct, with the fly-back diodes of course. that leaves 2 for the spindle control (forward and reverse), and the laser power enable, though that could easily be a SSR. i have a pair of 100A SSRs that would easily drive the laser enable, and leave room for future upgrade, while also being more reliable. and i am pretty sure i can drive it with 24Vdc control voltage.
 
Back
Top